Our Thanksgiving Candy Turkeys were fun to make and eat! MORE SOON, CHECK BACK!
Showing posts with label how to. Show all posts
Showing posts with label how to. Show all posts
Sunday


Thursday
HOW TO PREPARE A CANVAS
 Hi, This is PART II,
Yesterday's Blog showed HOW TO STRETCH A CANVAS, today I'm going to finish up by showing you what else needs to be done before you can start your painting.
For this job, you will need a big paintbrush, (not your fine brushes..)Any old brush should do as long as it doesn't lose hairs too easily, you will have a hard time if hairs keep falling out into your fresh coat of gesso. Get a brush, your gesso, and the stretched canvas you are prepping.
***Let me pause here to say that I am aware of (in fact I have used) pre-gessoed canvas. If you buy your canvas from an Art Supply Store, they may offer you pre-gessoed canvas. It will definitely save you time since it is already gessoed. The ONLY advantage is that it will save you time. However, it is not as cost effective as buying gesso and doing it yourself. If time is really that big of an issue, maybe you should be buying prestretched canvases. If you are going to be stretching your own, and you have the time to wait for gesso to dry, doing it yourself allows you to really build up the surface, while the pregessoed canvas is kinda flat. If you opt for pregessoed canvas, the only thing you may want to do after stretching it is thoroughly wet both sides of the canvas using your paintbrush, or a sponge. This will get the pg canvas to tighten a little more, since it is a little harder to stretch.***

 Start by wetting down the canvas. Using the brush makes this easy. This not only tightens it a bit, it gets the fabric wet so that the gesso will fill into the weave a bit easier. Once the Canvas is wet start plopping on the gesso and spreading it out.
 You really want to work the gesso into the grain of the fabric, use the water to get it to spread out everywhere. Gesso the sides of the canvas too, if you decide you want to paint them later they will already be gessoed and ready. (personally, I like the look of an unframed painting whose sides are painted.)
 This first coat may look mottled and "hardly there" once it is dried. That's ok, the canvas has soaked up the gesso and is ready for the second coat. Depending on how much gesso you used for the 1st coat you may want to sand the surface before you do a second coat. I put the second coat on real thick, and sand that down and do a 3rd coat of gesso as my final step. Get it on thick enough the 1st time and that 3rd coat may not be necessary. Sanding it is nice because after building the surface up, you may want to grind down areas that are very rough. Some folks skip this step, but whenever I have I regretted it once I was actually painting.

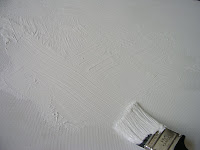 I like to do a sort of criss-cross hatchwork stroke, but the fun is creating whatever texture you would like to paint on. Once the final coat of gesso is done you will finally be able to begin your masterpiece..... but will you use Acrylics or Oils? That's a great question, check back for my ACRYLICS OR OILS Blog, to be published soon! As always, feel free to contact me with your Comments and/or Questions. GOOD LUCK! You know you can do this! ;D
Wednesday
HOW TO STRETCH A CANVAS
 The full title of this mini-tutorial is "How to Stretch a Canvas like an Artist instead of buying a Prestretched one like a Nerd." Please note, there are several ways to stretch canvases. This is the way that works best for me. If you have other ideas, please comment. I welcome any discussion on the topic. I have much to add, but I had to draw the line somewhere. Contact me with questions if you like, and I encourage you to experiment with this!
So, you wanna stretch a canvas...
First, lets start with a supply list:
Go to your local Art Supply Store (avoid the chains that focus on crafts, they will try to sell you a prestretched canvas, and most don't even carry stretchers!--even the ones who offer painting classes!) You will need a minimum of 4 wooden stretchers. They come in a
  variety of lengths. Today we will be stretching rectangular canvases, so make sure you get two pairs that at least match each other in length. Be creative. Do you want a long skinny canvas, or a square...? you choose. (unlike the prestretched, the dimensions are up to you) They cost about $1.50 to about $5 a piece, depending on what length you want.
Also, at the Art Supply Store you can buy canvas inexpensively. You may also get it at your local Fabric Store. At the Art Supply Store, don't fret, student grade canvas will work fine. You will be building up the surface with gesso, so whatever you use, make sure the weave is thick and strong. The texture of the cloth will grab the gesso, and the weave should be able to withstand being stapled and pulled. Get a good pair of fabric scissors.
I use a small staple gun because it is a little easier to wield. (My staple gun is Stanley Light Duty Sharpshooter that uses 5/16" staples, but yours should work.) Some folks do this with a nail gun... but not me.
Before you leave the Art Store, buy a bucket of gesso. This will be the priciest item maybe up to $20, or less if you can find a smaller bucket than mine. With one small prestretched canvas averaging at about $25, this bucket of gesso is a deal. It will cover many, many, canvases.
Let's get started... Lay out your 4 stretchers. Having carefully looked at them at the store, you know there are no massive imperfections, now is the time to double check your stretchers. Sometimes, one side is flat, and the other has a little lip. (If your stretchers are flat on one side, that's fine, but make sure that when you put them together they all have the flat side on the same side.)
Now, you have to cram them together. Use force & caution, if you break the little sliver of wood that wedges them together, it's not the end of the world, but it probably is the end of that stretcher. If it's difficult, that is good. It means they won't be loose, and move out shape once you "square" it. Ocassionally, you get a corner that is a little loose fitting. Deal w/ this by cramming a little thin piece of balsa wood in the slit, or use the nice little pre fabricated wooden or plastic spacers that are available at the art store FOR FREE when you buy the stretchers. (They may or may not be offered to you, but if you ask, they will be given to you.) After a little back and forth, wiggling the pieces together, you can use the floor to push against to slide them together the rest of the way if necessary. Don't worry if the corner isn't 90 degrees, that will come later, just get them together: 


 After getting all four corners together, you will need to "square" your canvas, making all of the corners 90 degree angles. There are a host of "tools" to help you do that. I like to use a doorframe. (I used a level & drafter's "T" ruler when I lived in a crooked house built in 1894). Just lean it against the frame and you should be able to move and slide the joints until it is adjusted correctly.
Then, you will want to keep it from moving any more.
Secure it, w/ staples and or those balsa wood (or plastic) spacers I mentioned.

 Lay out your canvas and lay the "frame" over it. When you cut the canvas, your impulse will be to not "waste" canvas, but make sure you leave enough extra to really grip and PULL. A little 1" or 2" margin will prob not be enough. Give yourself plenty of extra, and cut away the excess once the stretching is done.
Once you have cut out a piece of canvas to fit your frame you will want to make sure the side of the frame that you want to be the back is UP ontop of the canvas. It shouldn't matter which side of the canvas is up, but if it matters to you, make sure the side of the cloth you want to paint on is facing DOWN.
Next, fold the material over the frame and secure it with one staple in the middle of the stretcher. Don't worry about these first ones being tight, for now just secure each side:

 Now that the canvas is attached to the frame, you are going to stretch it, like tightening a drum. Pick a direction clockwise or counterclockwise (Widdershins or Doesil LOL) and work your way around from side to side, gripping & pulling the canvas tighter. With each pull, adding a staple, and moving to the next side. MAKE SURE NOT TO GET TOO CLOSE TO THE CORNERS.... YET.
(I space my staples about 1"- 2" apart on the first pass and then go around the already tightened areas again and give another pull, and stapling between my 1st pass)
 Grab the canvas, Pull the Canvas, Staple, & Work your way around
 Get as close to the corners as you can while still being able to manipulate and fold the cloth. There are lots of different ways to fold the corners, you'll find the easiest and best looking ones for yours. My corners look messy on the back of the canvas, but I never worry about the back.
 After you cut away excess fabric (yes you can do that now), fold the corner and secure it.
 Corners are the hardest part! Don't despair, refold as much as you need to, and don't staple till you like it! Your corners will be fabulous, and remember no one cares if the back is messy.

VOILA! Look I did 2!!
I did the first coat of gesso today too, I'll post that tomorrow, and I will show all the other steps to get them ready to paint on. So, Come Back! Let me know how your first try goes, & GOOD LUCK!
YOU CAN DO IT!
Make your painting more than just a craft. Paint on a canvas you have stretched yourself and you will know you are an Artist. ;D Read more...
Subscribe to:
Posts (Atom)

 Posts
Posts