HOW TO PREPARE A CANVAS
Yesterday's Blog showed HOW TO STRETCH A CANVAS, today I'm going to finish up by showing you what else needs to be done before you can start your painting.
For this job, you will need a big paintbrush, (not your fine brushes..)Any old brush should do as long as it doesn't lose hairs too easily, you will have a hard time if hairs keep falling out into your fresh coat of gesso. Get a brush, your gesso, and the stretched canvas you are prepping.
***Let me pause here to say that I am aware of (in fact I have used) pre-gessoed canvas. If you buy your canvas from an Art Supply Store, they may offer you pre-gessoed canvas. It will definitely save you time since it is already gessoed. The ONLY advantage is that it will save you time. However, it is not as cost effective as buying gesso and doing it yourself. If time is really that big of an issue, maybe you should be buying prestretched canvases. If you are going to be stretching your own, and you have the time to wait for gesso to dry, doing it yourself allows you to really build up the surface, while the pregessoed canvas is kinda flat. If you opt for pregessoed canvas, the only thing you may want to do after stretching it is thoroughly wet both sides of the canvas using your paintbrush, or a sponge. This will get the pg canvas to tighten a little more, since it is a little harder to stretch.***

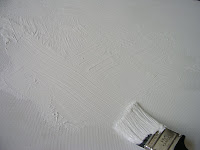
 Start by wetting down the canvas. Using the brush makes this easy. This not only tightens it a bit, it gets the fabric wet so that the gesso will fill into the weave a bit easier. Once the Canvas is wet start plopping on the gesso and spreading it out.
 You really want to work the gesso into the grain of the fabric, use the water to get it to spread out everywhere. Gesso the sides of the canvas too, if you decide you want to paint them later they will already be gessoed and ready. (personally, I like the look of an unframed painting whose sides are painted.)
 This first coat may look mottled and "hardly there" once it is dried. That's ok, the canvas has soaked up the gesso and is ready for the second coat. Depending on how much gesso you used for the 1st coat you may want to sand the surface before you do a second coat. I put the second coat on real thick, and sand that down and do a 3rd coat of gesso as my final step. Get it on thick enough the 1st time and that 3rd coat may not be necessary. Sanding it is nice because after building the surface up, you may want to grind down areas that are very rough. Some folks skip this step, but whenever I have I regretted it once I was actually painting.

 I like to do a sort of criss-cross hatchwork stroke, but the fun is creating whatever texture you would like to paint on. Once the final coat of gesso is done you will finally be able to begin your masterpiece..... but will you use Acrylics or Oils? That's a great question, check back for my ACRYLICS OR OILS Blog, to be published soon! As always, feel free to contact me with your Comments and/or Questions. GOOD LUCK! You know you can do this! ;D


0 comments:
Post a Comment